Getting started with b2blix feed
Connect your first supplier, map and import product data, create an XML export, generate the feed, and verify the final results before connecting it to a live sales channel.
This guide walks you through the first complete B2BLIX Feed setup: connecting one supplier, importing its products, creating an XML export, generating the file, and checking the result.
For a safer first setup, begin with one supplier and a controlled product group where possible. Check the imported data and generated XML before connecting the export to a live store, marketplace, price-comparison platform, or another destination.
Important: Supplier synchronization, catalog processing, export generation, and external-platform import are separate operations. A product appearing in B2BLIX does not automatically mean it has already been exported or published by another system.
Before you begin
Activate B2BLIX Feed in your B2BLIX account and collect the information required to access your first supplier feed.
You should normally have:
- A working XML or JSON source URL.
- Permission to download and process the supplier data.
- Authentication credentials or request headers, when required.
- The currency used by the supplier prices.
- Confirmation of whether the selected prices include VAT.
- The applicable VAT rate.
- The main language of the product content.
- The weight unit used in the source.
- Information about how frequently the supplier updates the file.
Open the source URL manually before adding it. Confirm that it returns the expected XML or JSON data rather than an error page, login page, or unrelated document.
Keep supplier access details private: Source URLs may contain customer identifiers or access tokens. Do not publish supplier URLs, passwords, request headers, or generated private export links.
1. Add your first supplier
Open Suppliers and click Add New Supplier.
You can also open the supplier form directly from Add new supplier.
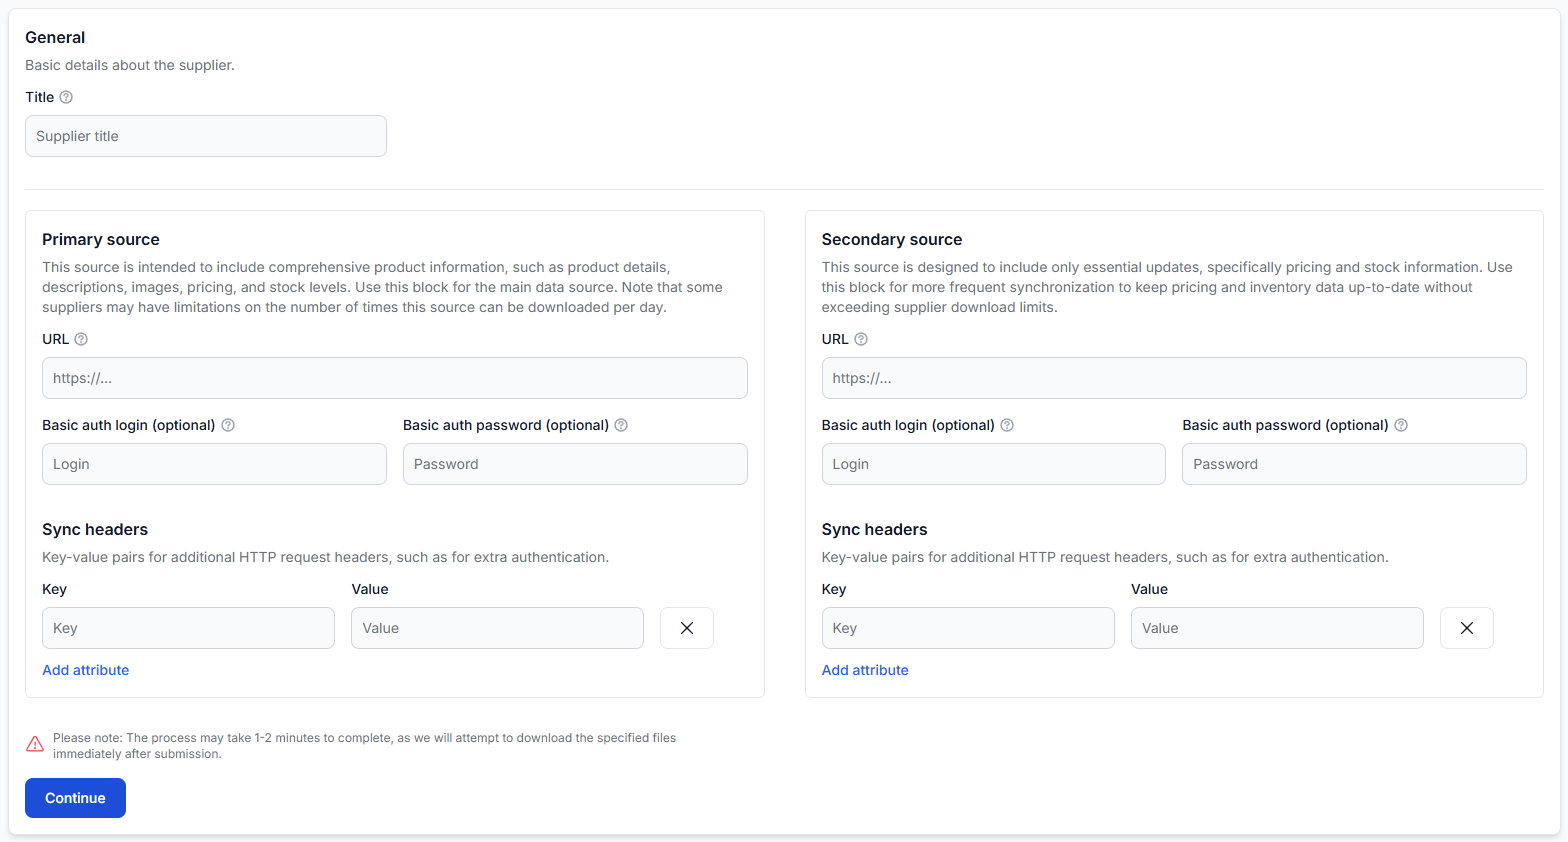
Enter the supplier title
Use a title that will remain clear when you later have several suppliers. A name such as Supplier name — main catalog is more useful than “Feed 1” or “New supplier.”
Add the primary source
The Primary source is the main supplier catalog. It normally contains the complete product records, including information such as:
- EAN and supplier SKU.
- Title and description.
- Price and stock.
- Images.
- Category and manufacturer.
- Weight, dimensions, color, and other attributes.
Enter the complete source URL. Add the basic-authentication login, password, or synchronization headers only when the supplier requires them.
Decide whether a secondary source is needed
The Secondary source is optional. Use it when the supplier provides a separate, usually smaller file for frequently changing information such as price and stock.
- One source: Enter the complete feed as the primary source and leave the secondary source empty.
- Two sources: Use the complete catalog as the primary source and the price-and-stock update file as the secondary source.
Do not add the same URL as both sources. A secondary source is useful only when it provides a separate dataset that must be connected to the main product records.
After entering the source information, click Continue. B2BLIX will request and inspect the source so that its product structure can be mapped. This initial check may take approximately one to two minutes.
For complete supplier-field instructions, read Suppliers: add and configure a supplier feed. For help deciding whether two sources are needed, read How to design primary and secondary supplier sources.
2. Configure how B2BLIX should interpret the supplier data
After the source is inspected, complete the supplier’s general, financial, content, and synchronization settings.
Keep the supplier disabled during setup
Leave Status set to Disabled until all required mappings have been completed and reviewed. This prevents incomplete settings from being used by scheduled catalog synchronization.
Complete the financial settings
- Country: Select the supplier’s country.
- Currency: Select the currency actually used by the mapped source price.
- VAT included: Specify whether the selected source price already includes VAT.
- VAT rate: Enter the value in the format shown by the interface. For example, the interface may use 1.20 for a 20% VAT rate.
Check the source price carefully: A supplier file may contain net, gross, recommended, original, or discounted prices. Currency and VAT settings must describe the field that you will actually map as Price.
Complete the content settings
- Default content language: Select the language used in titles and descriptions.
- Weight unit: Select grams or kilograms according to the source data.
- Allow uncategorized: Decide whether products without a resolved category may temporarily remain under an uncategorized value.
- Force zero stock: Define how long an absent product may remain unseen before its stock is changed to zero.
- Max last seen: Define how long a product that remains absent may be retained before removal.
Freshness values should be longer than the normal synchronization interval. As a practical starting point, allow at least approximately two expected synchronization cycles. Max last seen will normally be longer than Force zero stock.
Select synchronization frequencies
Choose a nonzero synchronization frequency for every configured source. Available intervals may include every 30 minutes, every hour, every 2, 3, 6, 12, or 24 hours.
For a simple first test, an hourly interval can be practical when the supplier permits hourly downloads. However:
- Do not select 30 minutes unless the supplier updates the file that often and permits that download frequency.
- A large primary catalog may need a longer interval, such as every 6, 12, or 24 hours.
- A smaller secondary price-and-stock source can usually be synchronized more frequently than the primary catalog.
- More frequent synchronization does not create newer data when the supplier updates its source less often.
- Supplier downloads are usage-based operations, so frequency can affect account usage.
3. Map the primary supplier source
After adding a new source, warnings such as Data mapping missing are expected. They mean that B2BLIX can access the source but does not yet know which supplier fields represent EAN, price, stock, title, and other standard attributes.
Click Build mapping for the primary source.
Select the product path
The first mapping step is to select the repeating source path that represents one complete product.
Choose a path that:
- Repeats approximately once per product.
- Contains the product’s EAN, price, stock, title, and other fields.
- Does not represent the complete file wrapper.
- Does not represent only one child field such as price, image, or manufacturer.
For example, if catalog/products/product repeats thousands of times and every matching element contains one complete product, it is likely to be the correct path.
Map the required product fields
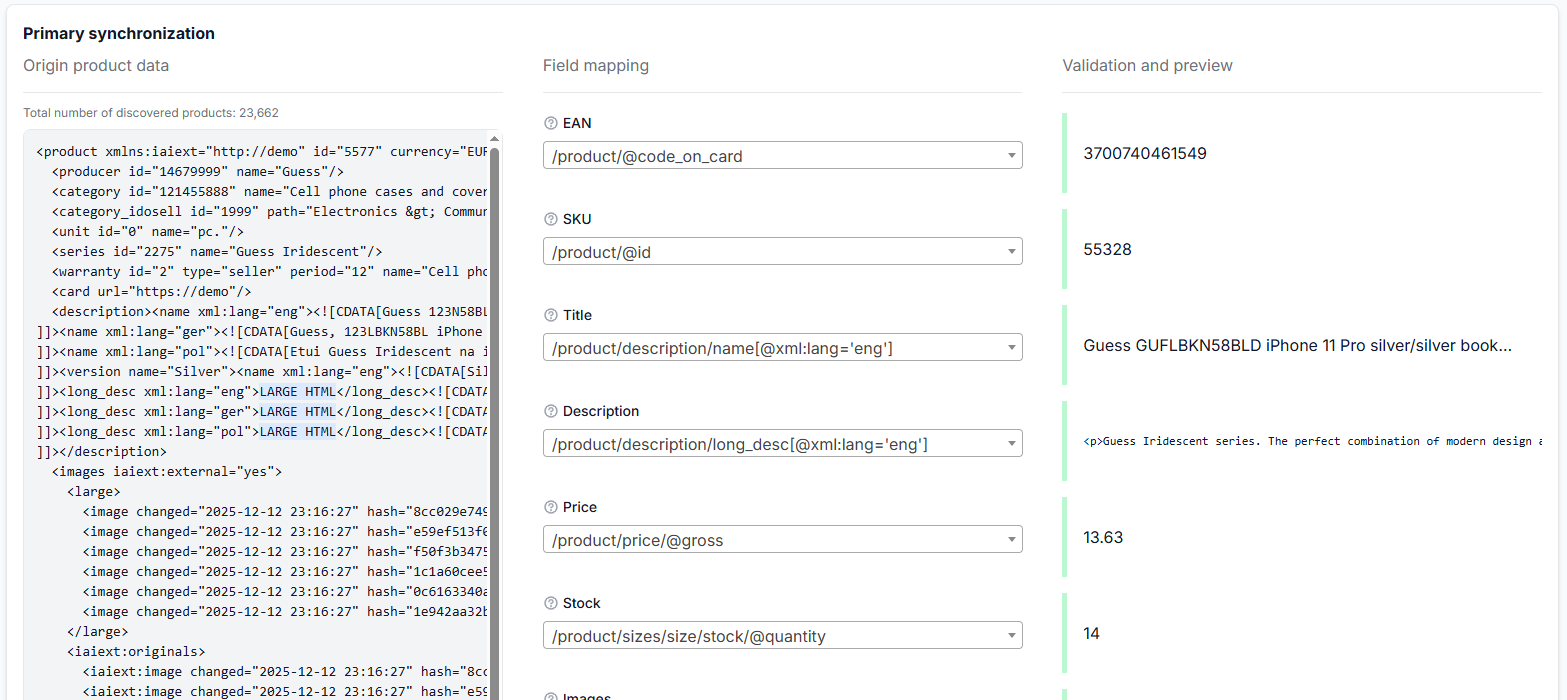
For a useful first setup, map at least:
- EAN
- SKU or supplier product ID
- Title
- Price
- Stock
- Category
Where available, also map description, images, category ID, manufacturer, weight, dimensions, color, and other useful attributes.
EAN is essential: B2BLIX uses EAN as the primary identifier in the standard catalog workflow. Products with missing, invalid, or rejected EAN values are not processed normally. Do not map an internal SKU or variation-group code as EAN unless it is genuinely the product’s barcode.
Check the preview for a real product before saving. Similar field names can have different meanings, especially when the source contains several identifiers or price fields.
For additional mapping and missing-product guidance, read How supplier mapping, price fields, currency, and missing-product diagnosis work.
4. Map and connect the secondary source, when used
Skip this step when your supplier uses only one source.
When a secondary source is configured, complete its mapping separately. Select the repeating product path and map:
- The stable identifier used to connect the source records.
- Price.
- Stock.
- Any other values that the secondary source is intended to update.
Next, open the Connection mapping. Select the corresponding identifier from the primary and secondary sources.
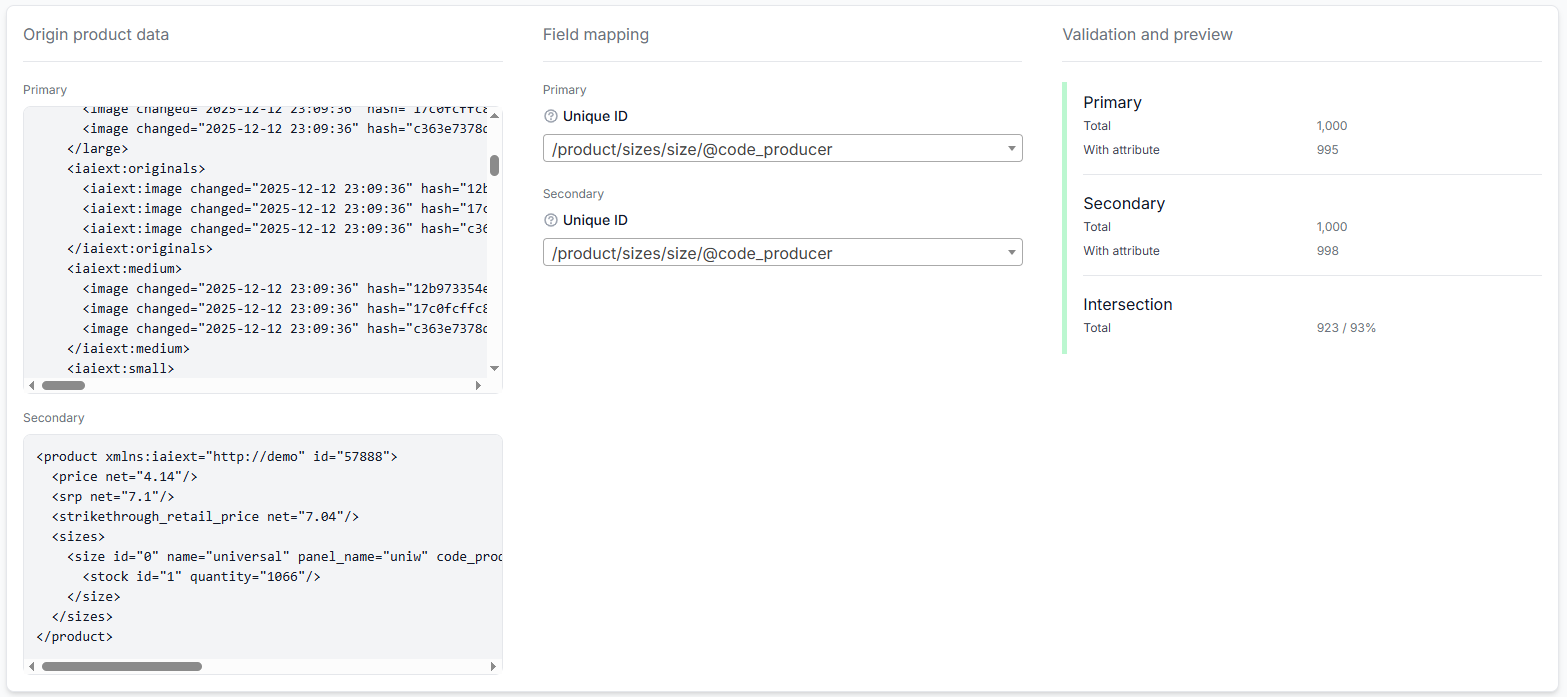
A suitable connection field may be:
- EAN.
- Supplier SKU.
- A stable supplier product ID.
The values must match in both files. Selecting primary EAN and secondary SKU will not work unless those two fields genuinely contain the same value.
Review the intersection statistics before saving. A very small number of matches may indicate:
- The wrong connection field was selected.
- One source contains prefixes, spaces, or different formatting.
- The secondary source contains only part of the supplier catalog.
- The selected paths do not represent complete products.
When two sources are used, the supplier setup should show a saved primary mapping, saved secondary mapping, and saved connection mapping before the supplier is enabled.
5. Enable the supplier and run the first scheduled import
After reviewing the settings and completing all displayed mapping tasks:
- Change Status to Enabled.
- Confirm that every configured source has a nonzero synchronization frequency.
- Click Update Supplier.
Wait for at least one configured synchronization interval. For example, when the supplier is synchronized once per hour, allow approximately one hour for the first scheduled catalog update.
Supplier synchronization and export generation are independent. At this stage, you are waiting for supplier data to enter the stored B2BLIX catalog; no export has been created yet.
For help identifying delayed processing, read How to monitor processing, translations, and feed synchronization.
6. Confirm that products were imported
Open All Products.
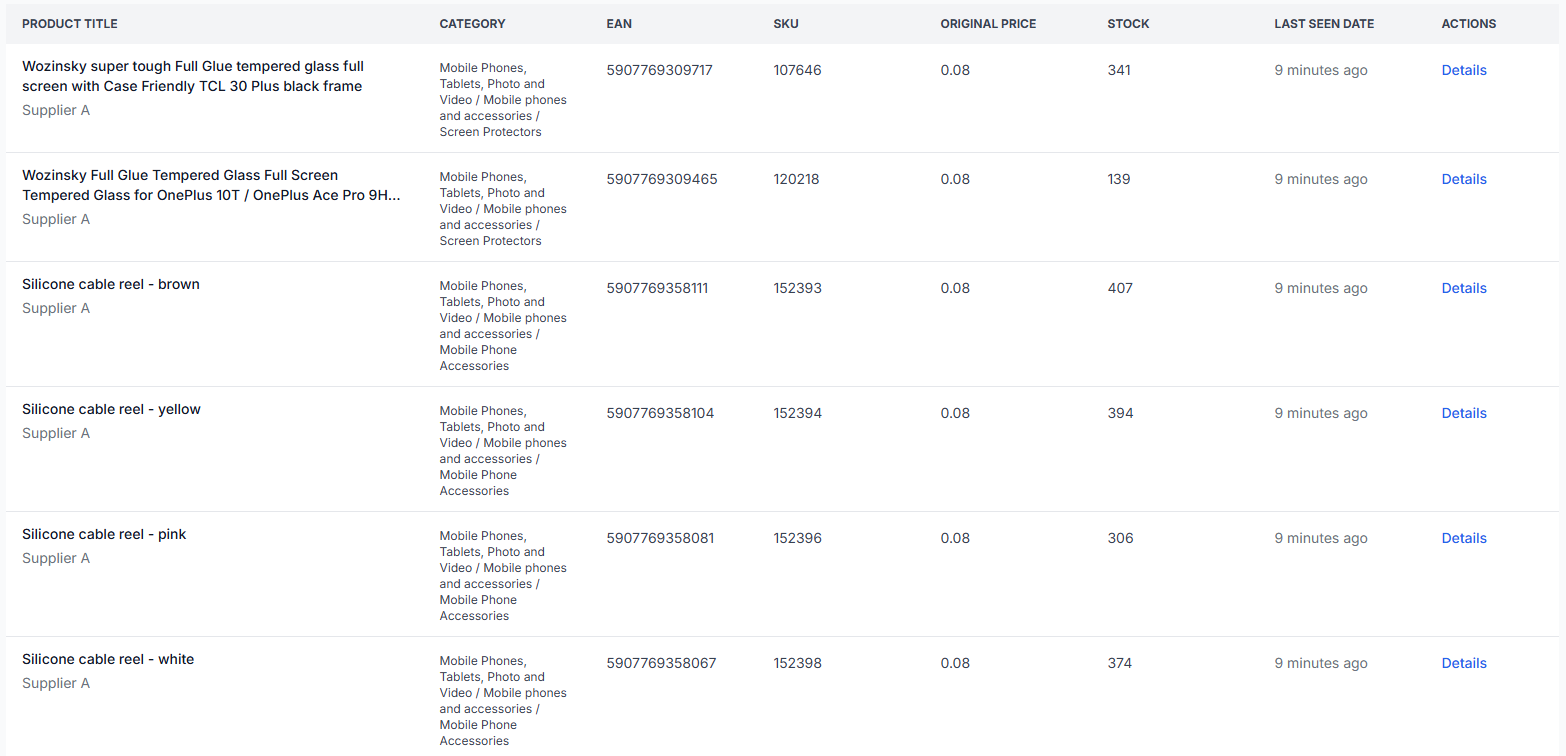
Filter by the new supplier or search for several known EANs. Check:
- The product title.
- EAN and SKU.
- Supplier price.
- Stock quantity.
- Category.
- The last-seen or synchronization information.
Open product details to inspect the complete mapped record.
Do not create the export yet if products are missing, EAN values are incorrect, prices use the wrong field or currency, stock is missing, or the imported values do not match the supplier source.
If an EAN is present in the supplier file but cannot be found in All Products, check the product path, EAN mapping, source connection, category handling, supplier status, and synchronization frequency.
For page instructions, read All Products interface. For EAN and category requirements, read How required product fields and category mapping work.
7. Create your first XML export
After confirming that supplier products are stored correctly, open Exports and click Add New Export.
You can also open Add new export directly.
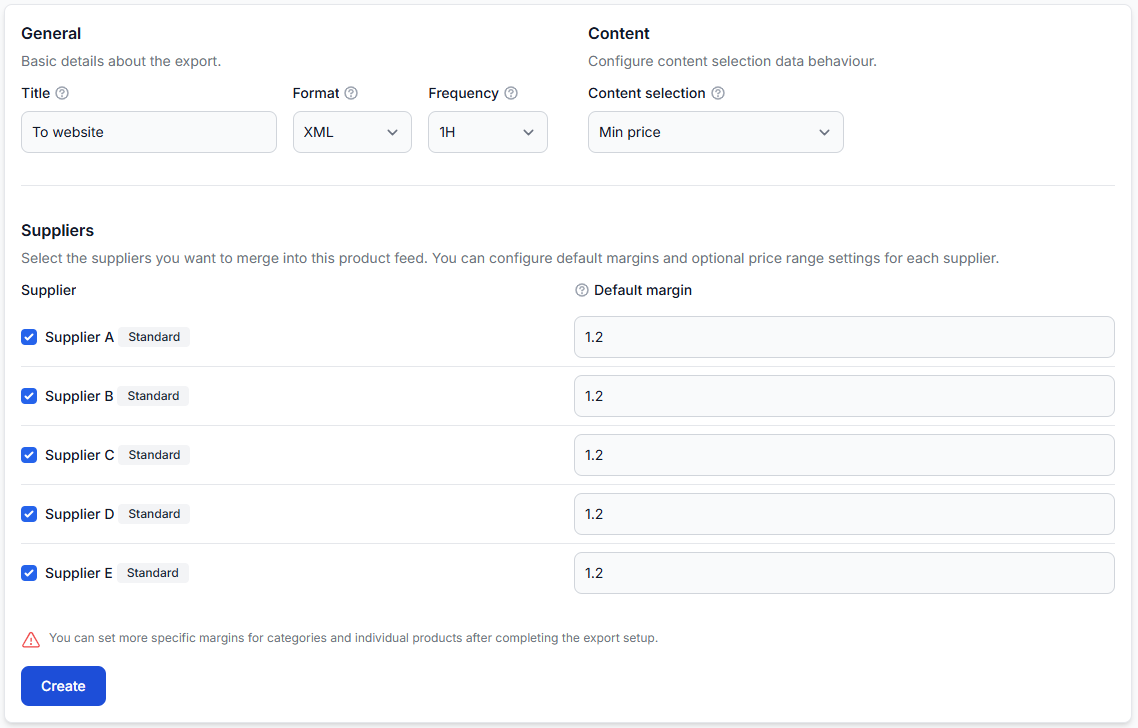
Complete the general export settings
- Enter a clear Title, preferably based on the destination.
- Select XML as the format.
- Select a nonzero Frequency.
- Select the required Content selection method.
- Select the supplier you configured.
- Enter the supplier’s Default margin.
- Click Create.
Choose an export frequency
The export frequency determines how often B2BLIX generates a new XML file from the latest catalog data. Available intervals may include every 30 minutes, every hour, every 2 hours, or every 3 hours.
An hourly export is a practical starting point for many test configurations. Remember that:
- The supplier and export frequencies are independent.
- An export can only use supplier data that has already reached the catalog.
- Generating an export more frequently than the supplier updates does not make the supplier information fresher.
- Export generations are usage-based operations.
Choose content selection
When the export uses only one supplier, content selection usually does not change the first result. When several suppliers later provide the same EAN:
- Min price uses content from the supplier offering the lowest eligible price.
- Max content length favors the supplier with richer or longer product content.
Set the default margin
The default margin is a multiplier applied separately to each selected supplier.
- 1.0 keeps the price unchanged.
- 1.1 adds 10%.
- 1.2 adds 20%.
Margin warning: Enter a multiplier, not a whole-number percentage. A value of 20 does not mean a 20% margin.
For the complete export interface, read Exports: create and configure XML export projections.
8. Add a simple export filter
Find the new export in the Exports list and open Edit filter.
An export filter decides which catalog products may continue to the export template and generated XML.
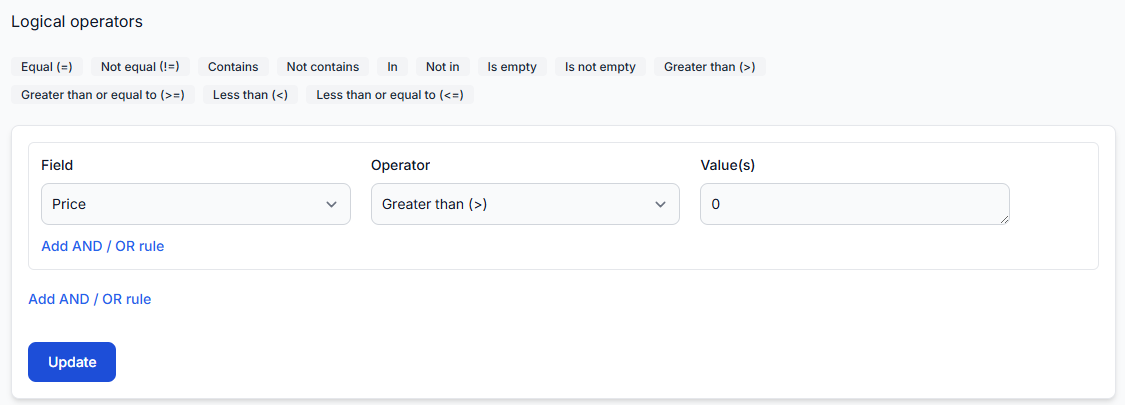
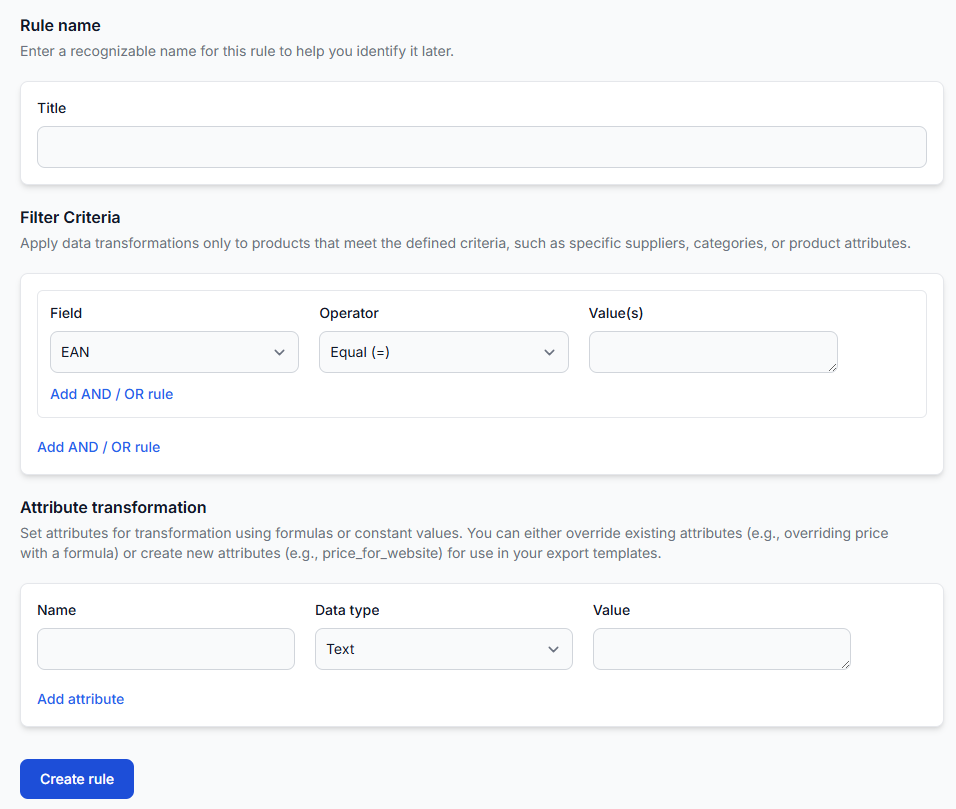
For a basic first export, create this condition:
| Field | Operator | Value |
|---|---|---|
| EAN | Is not empty | No value required |
This creates an explicit identifier requirement in the export. B2BLIX already requires a usable EAN for the standard catalog workflow, but the filter makes the destination requirement clear.
For a selling-price export, you may also add:
| Field | Operator | Value |
|---|---|---|
| Price | Greater than | 0 |
Connect the EAN and price conditions with AND so that both must be true.
Avoid complex category, supplier, manufacturer, stock, or exclusion groups during the first test unless they are required by the destination. Add them gradually after checking known products that should pass and known products that should be excluded.
For detailed AND/OR logic and exclusions, read How export filters and product exclusions work.
9. Decide whether transformations are needed
You can skip transformations during the first setup when the supplier’s mapped values and default export margin already produce the required result.
Use Data Transformation Rules later when you need to:
- Create a destination-specific price.
- Apply advanced category or product margins.
- Round prices.
- Change stock values.
- Clean HTML from descriptions.
- Translate titles or descriptions.
- Create new attributes for the XML template.
Creating a rule does not activate it automatically. The rule must also be enabled in the relevant export and assigned an appropriate priority.
For the first export, also leave Discounts empty unless a campaign discount is specifically required.
For rule instructions, read Data transformation rules.
10. Build the XML export template
Return to the Exports list and open Edit template.
The template controls how the selected product data is written into the generated XML. It defines:
- The repeating XML product path.
- The output field names.
- The B2BLIX attributes used as dynamic values.
- Optional fixed or fallback values.
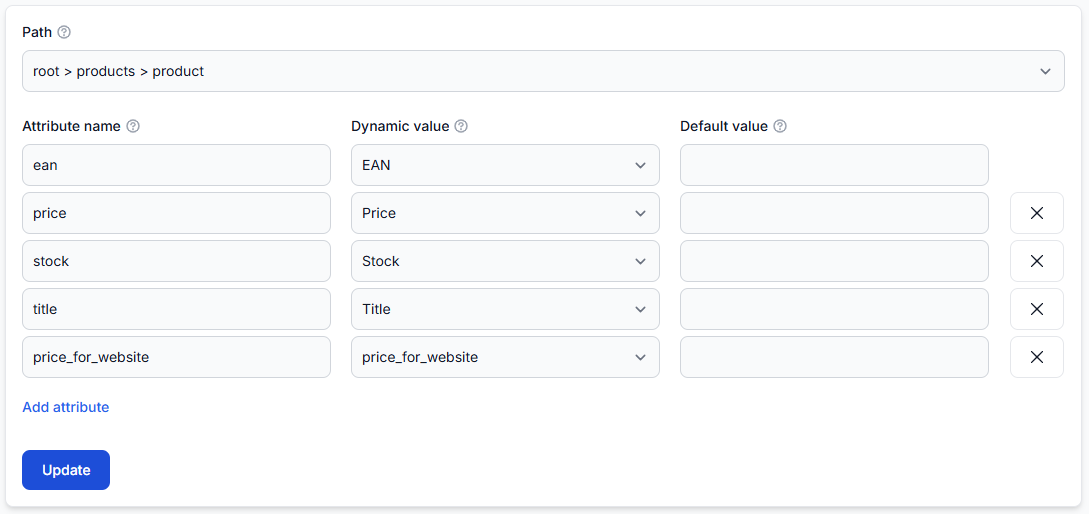
Set the product path
Use the repeating product path required by the destination. For example, a simple structure may use:
products > product
In that structure, one product element is generated for every product that passes the export filter.
Add the output fields
A simple test template can include:
| XML attribute name | Dynamic value |
|---|---|
| ean | EAN |
| price | Price |
| stock | Stock |
| title | Title |
Click Add attribute for each additional field and click Update when the template is complete.
Destination requirements take priority: The example above is useful for checking that XML generation works, but it is not a universal marketplace specification. Before connecting the URL to another system, use that destination’s exact path, field names, required attributes, formats, and permitted values.
Use default values carefully. A text fallback may sometimes be acceptable, but a fixed price or stock value can hide missing supplier data and create incorrect commercial information.
For complete template planning, read How to turn a destination XML specification into a B2BLIX export template.
11. Generate the first XML file
Return to the Exports list and open Modify for your export.
Check that:
- The correct supplier is selected.
- The default margin is correct.
- The export frequency is greater than zero.
- The filter and template have been saved.
Click Run synchronization, the manual synchronization action, to generate the export immediately rather than waiting for the next scheduled export interval.
After generation, the Modify section displays the export’s public XML URL. The address remains associated with that export projection.
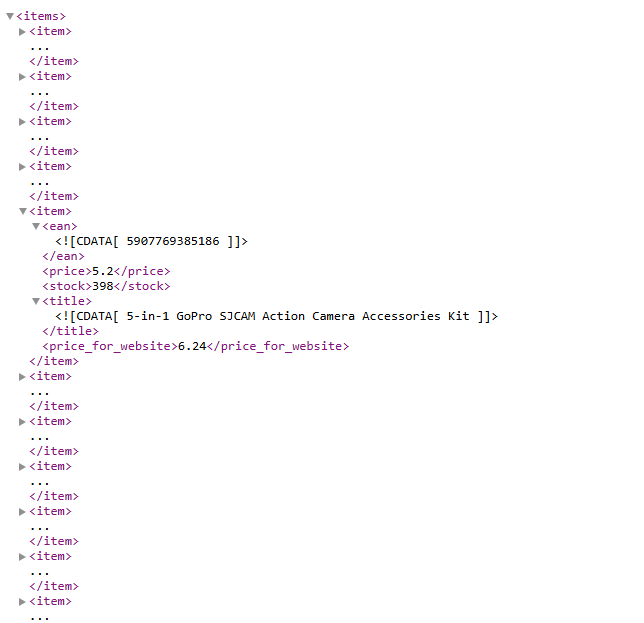
Check:
- That the file opens successfully.
- That it contains products.
- That the product path and XML field names are correct.
- That EAN, price, stock, and content values are reasonable.
- That the default margin produced the expected price.
- That no unexpected suppliers or products are included.
Do not connect an untested export to a live destination. A valid XML document can still contain incorrect prices, stock values, product selections, or field names.
12. Check representative products in Exports Checker
Open Exports Checker.
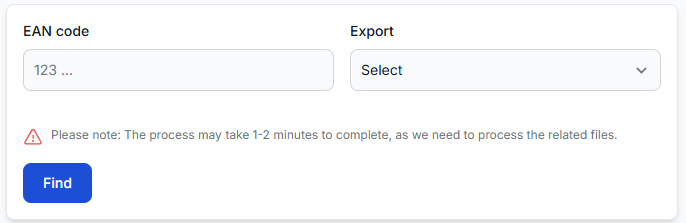
- Enter the complete EAN of a known product.
- Select the new export.
- Click Find.
- Allow approximately one to two minutes for the report to be prepared.
Review:
- The original data received from each supplier.
- The supplier selected for the product.
- The original price and stock.
- The default margin and other calculations.
- The export filter result.
- Any transformations that affected the product.
- The final attributes.
- The representative exported XML.
- Any exclusion reason when the product was not exported.
Check several representative products, including:
- A normal in-stock product.
- A low-price and a high-price product.
- A product with limited content.
- A product from each selected supplier when more suppliers are added.
- A product you expect the filter to exclude.
For report details, read Exports Checker: review product data and export results.
13. Connect the verified XML URL to its destination
After the generated XML structure and product values have been checked, copy the public URL from the export’s Modify section and add it to the destination according to that platform’s feed-import instructions.
The external destination controls:
- When it downloads the XML.
- How it validates the fields.
- Which products it accepts or rejects.
- When accepted information becomes visible.
B2BLIX generating the expected XML does not by itself confirm that the destination has downloaded, accepted, or published it.
For a safe launch workflow, read How to prepare, test, and connect a marketplace export.
Quick troubleshooting path
| What you see | What to check |
|---|---|
| The product is in the supplier source but not in All Products | Product path, EAN mapping, price and stock mappings, source connection, category handling, supplier status, and supplier synchronization. |
| The product is in All Products but not in the export | Selected suppliers, export filter, price or stock conditions, and the exclusion reason in Exports Checker. |
| The product is exported with an unexpected price | Mapped supplier price, currency, VAT settings, default margin, transformations, discounts, and template value. |
| The generated XML still shows old information | Confirm that supplier synchronization completed first, then run export synchronization again. |
| The XML is correct but the product is missing externally | The destination’s download schedule, required fields, validation messages, category requirements, and processing delay. |
Final setup checklist
- B2BLIX Feed is active.
- The supplier source URL opens and returns the expected XML or JSON.
- The supplier’s currency and VAT settings describe the mapped price correctly.
- The content language and weight unit are correct.
- The primary product path represents complete individual products.
- EAN, price, stock, title, and category are mapped correctly.
- The secondary source and connection mapping are complete when two sources are used.
- The supplier is enabled and every configured source has a nonzero frequency.
- The first supplier synchronization has completed.
- Representative products are visible and correct in All Products.
- The export includes the intended supplier.
- The default margin is entered as a multiplier.
- The export has a nonzero generation frequency.
- The export filter contains at least the intended EAN requirement.
- Unnecessary transformations and discounts are disabled during the first test.
- The XML template follows the destination’s required structure.
- Manual export synchronization has completed.
- The public XML URL opens and contains the expected products.
- Representative EANs have been reviewed in Exports Checker.
- The XML has been tested before being connected to a live destination.
After the first supplier and export work correctly, add more suppliers, filters, transformation rules, categories, languages, and destination-specific exports gradually. Regenerate and check the relevant export after every significant configuration change.