Getting started with b2blix price aggregators
Create your first price synchronization, prepare a small product feed, collect competitor prices, review calculated results, and safely test XML or store delivery before expanding to your full catalog.
This guide explains how to create your first B2BLIX Price Aggregators synchronization, import a small product group, collect public competitor offers, review the calculated prices, and prepare the results for your store.
The recommended approach is to begin with one price comparison source and a small group of representative products. After you confirm that the imported data, search results, calculations, and export are correct, you can add more products or increase the monitoring frequency.
Important: B2BLIX uses the exact product query that you provide. It processes the public result cards returned by the selected price comparison source, but it does not independently confirm that every result is the same product, model, variant, condition, or promotion.
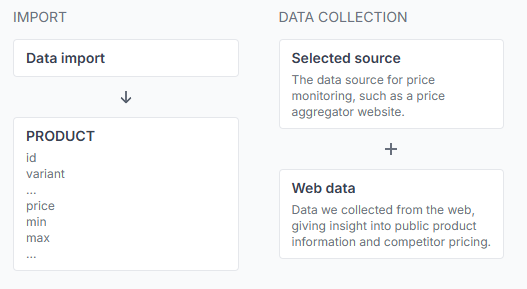
How the setup works
A price synchronization connects:
- Your product source, such as a Google Spreadsheet or XML feed.
- One selected price comparison platform.
- A product-monitoring schedule.
- BuyBox calculation settings.
- An XML output or supported store integration.
- Reports and product-level calculation details.
Each synchronization works independently. If you want to monitor the same products on another price comparison platform, create another synchronization for that source.
The term BuyBox in B2BLIX refers to the internal B2BLIX comparison and pricing model. It does not mean that the selected price comparison platform operates an official marketplace BuyBox or declares a winning seller.
Step 1: Prepare a small product source
Begin with a small pilot instead of your complete catalog. A group of approximately 10–100 representative products is normally easier to review than several thousand products.
You can use either:
- A URL-based XML file.
- A Google Spreadsheet accessible through its link.
A Google Spreadsheet is often the simplest option for an initial test.
Required product information
For basic monitoring, every product needs a stable id and a non-empty query. For automatic price calculation, also provide the current price and safe min and max limits.
| Attribute | Requirement | Purpose |
|---|---|---|
| id | Required | A stable product identifier, such as your store product ID or EAN. |
| query | Required | The exact text B2BLIX submits to the selected price comparison source. |
| price | Needed for calculation | Your regular or base catalog price before the B2BLIX calculation. |
| min | Required for automatic repricing | The lowest price B2BLIX may suggest. |
| max | Required for automatic repricing | The highest price B2BLIX may suggest. |
| variant | Optional | Distinguishes sizes, colours, models, or other variations that share an ID. |
| frequency | Optional | Overrides the synchronization’s default monitoring frequency for this product. |
An initial spreadsheet could contain data similar to this:
| id | query | price | min | max |
|---|---|---|---|---|
| 4750000000000 | 4750000000000 | 79.99 | 70.00 | 85.00 |
| SKU-1002 | Manufacturer Model ABC 128 GB | 249.00 | 225.00 | 270.00 |
An EAN is normally a useful starting query, but it may not return suitable results on every platform. Test each query directly on the selected price comparison website before adding it to the synchronization.
Check that the returned results represent the intended model, capacity, size, colour, condition, and package quantity. Use a more specific product code or title when the EAN does not produce useful results.
Products without the required minimum and maximum limits should not receive an unprotected automatic price adjustment. Their base price may be returned instead.
Make a Google Spreadsheet accessible
- Open the spreadsheet’s sharing settings.
- Set general access to Anyone with the link.
- Select Viewer permission.
- Open the link in a private browser window.
- Confirm that it can be viewed without signing in.
Do not include passwords, API credentials, private customer information, or other confidential data in a publicly accessible product source.
For a complete description of the supported product attributes, read What data is required for product monitoring and repricing?.
Step 2: Create a price synchronization
- Open Price synchronization.
- Select Create new synchronization.
- Enter a clear title, such as Kaina24 – Pilot Products.
- Choose whether the synchronization should be active immediately.
- Enter the URL of your XML file or Google Spreadsheet.
- Select the matching import format.
- Select how often B2BLIX should import your source.
- Select the price comparison platform that should be monitored.
- Select the default product-monitoring frequency.
- Select XML as the initial export format.
- Select the export frequency.
- Review the form and select Create.
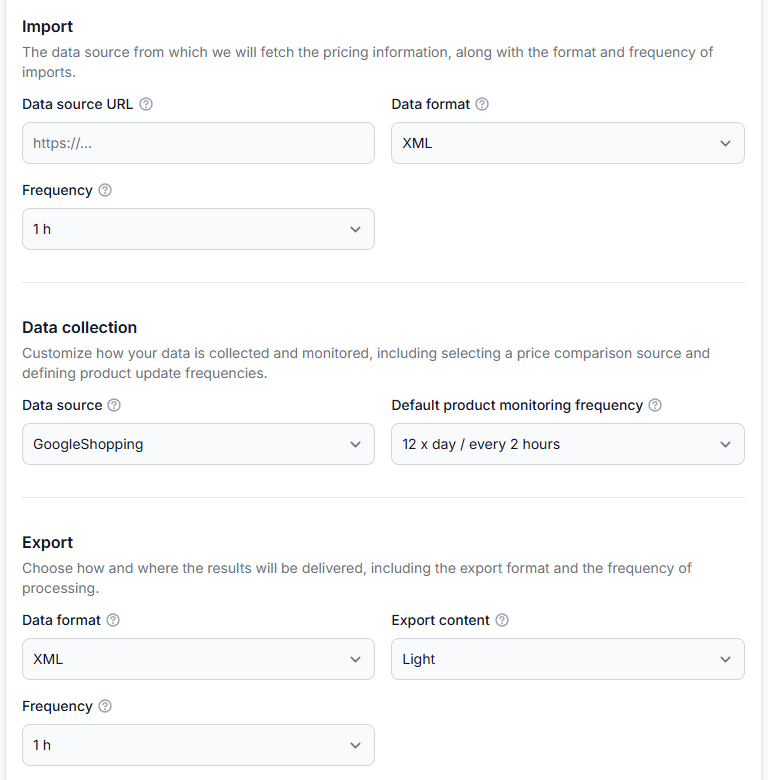
Example pilot configuration
| Setting | Example |
|---|---|
| Title | Kaina24 – Pilot Products |
| Import format | Google Spreadsheets |
| Import frequency | Every 1 hour |
| Data source | The intended price comparison platform |
| Monitoring frequency | 4 times per day for a basic pilot, or another frequency appropriate for your market |
| Export format | XML |
| Export frequency | Every 1 hour |
Select Active: Yes only when the source URL, product queries, price limits, and monitoring frequency are ready. An active synchronization can begin scheduled and chargeable data collection.
When the setup is not ready, create it with Active: No. You can activate it later from its General Settings.
For a detailed explanation of every creation field, read Price synchronization: view and create a synchronization.
Step 3: Understand the three schedules
Import, monitoring, and export are separate processes. They do not necessarily happen at the same moment.
| Schedule | What it controls |
|---|---|
| Import frequency | How often B2BLIX reads updated product records from your spreadsheet or XML source. |
| Product-monitoring frequency | How often B2BLIX submits product queries to the selected price comparison source. |
| Export frequency | How often calculated output is regenerated or sent to the configured destination. |
For example, B2BLIX may import your spreadsheet every hour, monitor each product four times per day, and regenerate the XML output every hour.
Increasing the import frequency does not make competitor monitoring more frequent. Increasing the monitoring frequency also does not make the XML or connected store update immediately.
Monitoring frequency affects data freshness and usage. Use faster monitoring only for products that need more frequent observations.
For rollout and frequency guidance, read How monitoring frequency, catalog size, and pilot scope affect your setup.
Step 4: Review the initial BuyBox settings
After creating the synchronization, open its BuyBox settings.
The page may already contain initial or recommended values. You do not need to customize every strategy during basic setup, but you should review the settings before relying on the calculated prices.
At minimum, check:
- Seller name: Enter your store name or domain exactly as it appears on the selected price comparison platform.
- Floor: Confirm that the synchronization-wide floor is commercially safe and does not conflict with the product ranges in your source.
- Step: Confirm that the adjustment amount is suitable for the normal price level of your products.
- Target position: Confirm whether the strategy should target the first result, Top 3, Top 10, or the first page.
- Seller filters: Leave them empty during the first test unless you already have a clear reason to exclude or prefer specific sellers.
- Freshness settings: Confirm that they are not shorter than the normal monitoring interval.
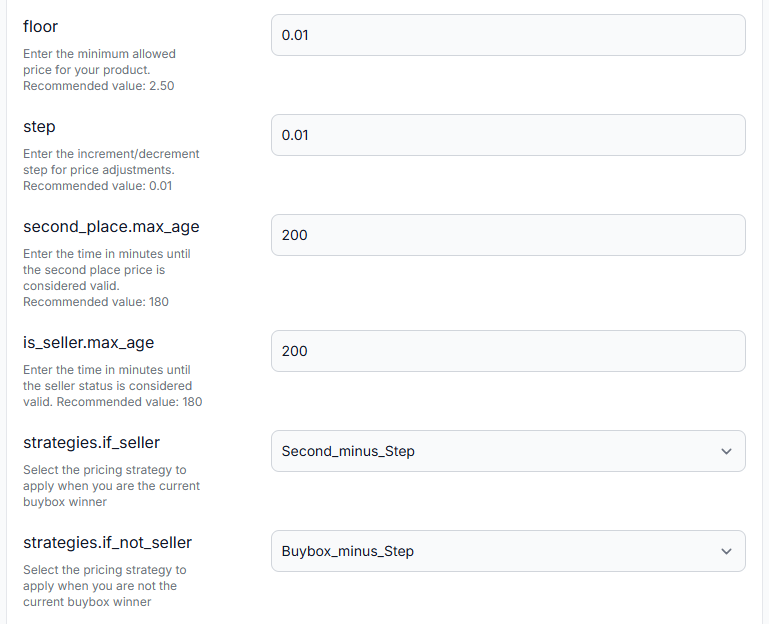
The selected comparison target is not necessarily the first or cheapest returned offer. Seller filters, skipped leading offers, and the selected target position may change which result is used.
For details about these controls, read Configure BuyBox settings for a price synchronization.
Step 5: Activate the synchronization and allow monitoring to begin
If you created the synchronization as inactive, return to its General Settings, set Active to Yes, and save the form when you are ready to begin.
After activation, the workflow normally proceeds through several stages:
- B2BLIX imports the latest product source.
- The imported products become available for scheduled monitoring.
- B2BLIX submits each product’s query according to its monitoring frequency.
- Public result cards are collected from the selected source.
- The latest usable observations are evaluated during synchronization processing.
- The calculated results are prepared for XML or the selected integration.
Allow enough time for at least one product-monitoring cycle. Depending on the configured frequency and source conditions, useful public data may not be available immediately after the synchronization is created.
Using manual execution
You can start a synchronization run manually from its General Settings instead of waiting for the next scheduled synchronization run.
- Open the synchronization list.
- Open Modify general settings for the required synchronization.
- Find the manual execution control.
- Start the synchronization.
- Open its reports and follow the new manual run.
Manual execution starts import, calculation, and configured output processing for that run. It does not replace the product-monitoring schedule and does not guarantee that fresh competitor observations have already been collected.
For the first meaningful calculation, allow monitoring to collect public data and then run another synchronization if you do not want to wait for the next scheduled calculation and export.
For details about activation, manual execution, schedules, and the public XML URL, read Price synchronization: edit general settings.
Step 6: Check the synchronization report
Use reports to confirm that product import, calculation, and export processing completed.
- Open Price Synchronization.
- Find your new synchronization.
- Locate the Reports column.
- Select View.
- Start with the newest report.
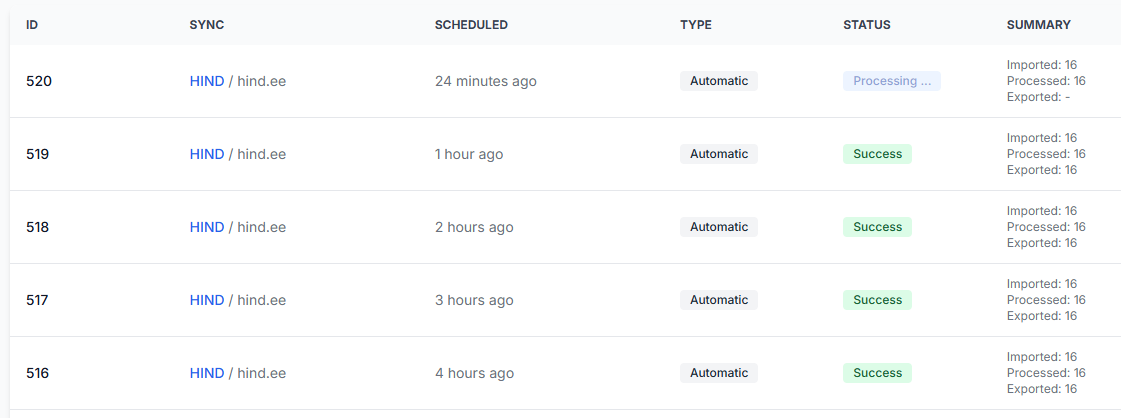
Check the following values:
- Type: Confirms whether the run was automatic or manual.
- Status: Shows whether the run is processing, successful, or failed.
- Imported: Shows how many product records were received from your source.
- Processed: Shows how many records were handled during the run.
- Exported: Shows how many records were included in the output or export workflow.
A report marked Processing has not necessarily failed. Wait for it to finish before evaluating incomplete totals.
The imported, processed, and exported numbers do not have to match in every situation. Open the full report when a product was rejected, excluded, or not included in the output.
For detailed instructions, read How to view reports for a price synchronization.
Step 7: Confirm that your products were imported
Open All products and select your synchronization.
Use this page to confirm:
- The expected pilot products are present.
- The product ID and optional variant are correct.
- The latest import timestamp is recent.
- Public web data has been collected.
- The stored public title and product link represent the intended product.
- The imported, comparison, and calculated prices are reasonable.
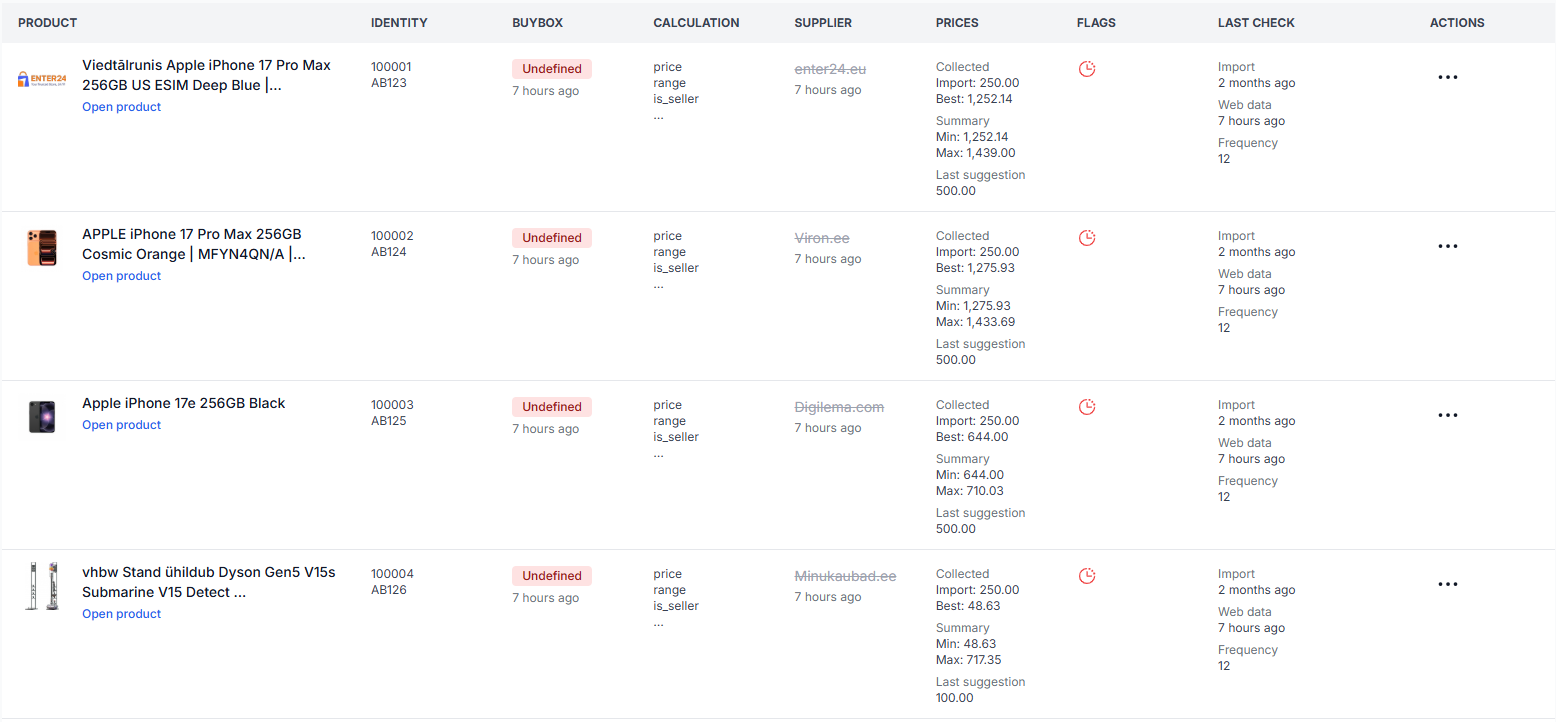
When you know an EAN but cannot find the product directly, remember that the EAN may have been used as the product’s query rather than its imported id. Search the product list first to confirm the stored ID.
For details about the filters, columns, and actions, read the All Products interface guide.
Step 8: Review individual calculations in Product Checker
Product Checker is the most important validation step before using calculated prices in a live store.
- Open Product checker.
- Select the correct synchronization.
- Enter the exact imported product ID.
- Enter the variant when the product uses one.
- Select Find.
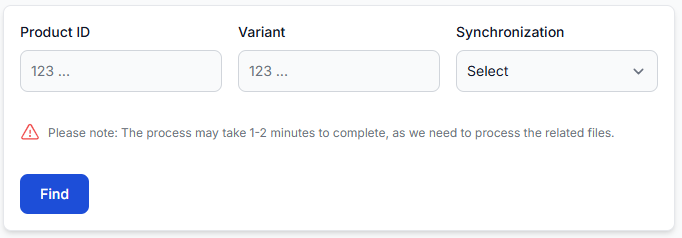
Review four areas for every initial pilot product.
1. Imported source data
Confirm:
- The product ID and variant.
- The exact query.
- The base price.
- The minimum and maximum prices.
- The product monitoring frequency.
- The last import timestamp.
2. Public data overview
Review the first and second public result cards, including their titles, displayed prices, suppliers, images, and product links.
Confirm that the results are commercially comparable with your own product. Pay particular attention to similar models, different capacities, bundles, product conditions, and promotional offers.
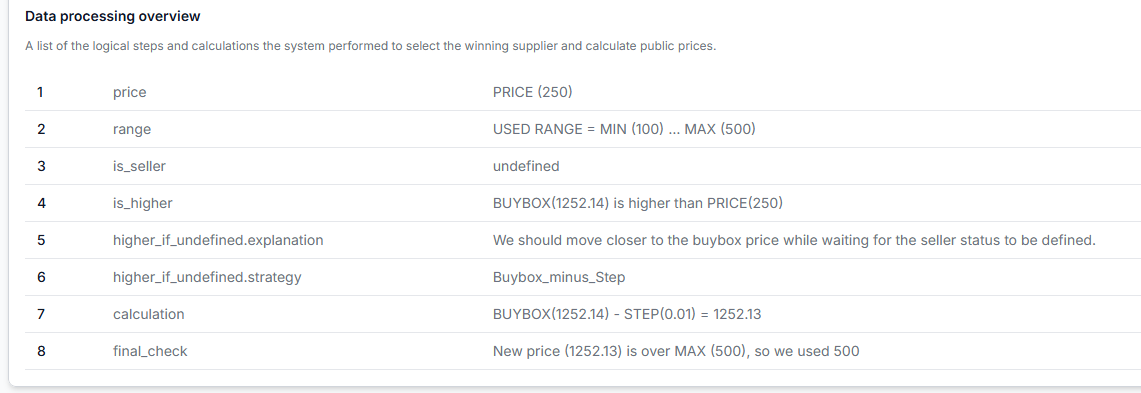
3. Data processing overview
Check:
- The detected seller state.
- The selected comparison target.
- The pricing strategy used.
- The provisional calculation.
- The final minimum and maximum range check.
4. Exported data summary
Confirm that the value prepared for export matches the final calculation after the range check.
Do not treat the provisional calculation as the final exported price. The product minimum, product maximum, or synchronization-wide floor may change the final result.
For a full explanation of Product Checker, read Product checker: review product data and price calculations.
Step 9: Check the XML output
When XML is selected as the export format, the synchronization’s General Settings page displays a generated public XML URL.
- Open the synchronization’s General Settings.
- Locate the public XML URL.
- Open the output.
- Confirm that the expected pilot products are included.
- Check their product IDs and optional variants.
- Compare their calculated prices with Product Checker.
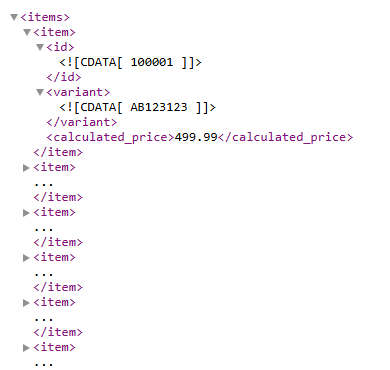
Viewing the XML does not change your store prices. Your store, CMS, or another receiving system must be configured to read and apply the output.
Treat the public XML URL as access information for your price feed. Share it only with the people or systems that need it.
Step 10: Connect or enable store delivery
After validating the pilot through XML, Product Checker, and reports, you can configure a supported store integration when one is available for your account.
Depending on the available options, B2BLIX may deliver calculated prices through:
- XML output.
- A WooCommerce integration.
- A PrestaShop integration.
- Another supported destination shown in your account.
Before enabling automatic store updates, confirm:
- The correct store or destination is connected.
- The synchronization is active.
- Product IDs and variants match the destination products.
- Every automatically repriced product has valid minimum and maximum prices.
- The export schedule is appropriate.
- Several calculated results have been reviewed manually.
An active store integration can affect live product prices. Enable it first for a limited product group and confirm the results in the destination store before expanding the catalog.
For delivery details, read How calculated prices are delivered to a store or another sales channel.
Common first-setup problems
No products were imported
- Confirm that the source URL opens without signing in.
- Check that the selected import format matches the source.
- Review the latest synchronization report.
- Confirm that the spreadsheet or XML uses the required field names.
Products are imported but no public data appears
- Confirm that the synchronization is active.
- Check the product-monitoring frequency.
- Allow enough time for a monitoring cycle.
- Test the exact product query directly on the selected source.
- Confirm that the selected synchronization uses the intended platform.
The query returns the wrong product
Change the query in your product source. Use a more specific EAN, manufacturer code, model name, or title. B2BLIX does not automatically correct or replace an unsuitable query.
The calculated price remains equal to the base price
- No usable public result may have been returned.
- The product may be missing a valid minimum or maximum.
- The selected strategy may keep the base price in the current situation.
- The collected information may be too old for the selected strategy branch.
The calculated price stopped at the minimum or maximum
The provisional calculation was outside the permitted product range. The final safety check limited the result to the closest permitted boundary.
The XML has not updated yet
- Check the export frequency.
- Confirm that the latest synchronization report has completed.
- Remember that monitoring and export use separate schedules.
The store did not update a product
- Confirm that the correct export method is selected.
- Check the destination connection.
- Confirm that the product ID and variant match the store product.
- Review the exported count in the synchronization report.
Getting started checklist
- Create a small product spreadsheet or XML source.
- Add a stable ID and tested query for every product.
- Add the base price and safe minimum and maximum limits.
- Test every query directly on the selected price comparison platform.
- Create one synchronization for one source.
- Select suitable import, monitoring, and export frequencies.
- Review the initial BuyBox settings and enter your exact seller name.
- Activate the synchronization.
- Allow at least one monitoring cycle to complete.
- Review the latest synchronization report.
- Confirm the imported products in All Products.
- Review several calculations in Product Checker.
- Check the generated XML or integration output.
- Enable automatic store delivery only for the validated pilot group.
- Expand the catalog or increase monitoring frequency only after the results and usage are understood.